Creamy No-Bake Vegan Pumpkin Pie (Easy Blender Recipe)
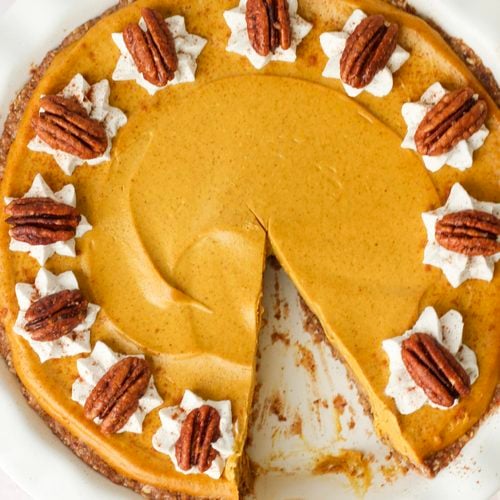
If you love traditional pumpkin pie but crave something creamier, you'll love this Creamy No-Bake Vegan Pumpkin Pie. Made with pumpkin puree, cashews, and warm fall spices, this easy blender dessert has a silky, mousse-like filling and all the cozy flavors of a holiday classic. Perfect for Thanksgiving!
Servings: 10 slices
Calories: 409kcal
Equipment
- 1 9-inch pie dish
- 1 high speed blender
- 1 food processor
Ingredients
For the crust
- 1½ cups old-fashioned oats *If gluten-free, use certified gluten-free oats.
- 1 cup raw pecans
- 8 soft Medjool dates, pitted *Leave them out on the counter for 24 hours to soften
- 2 tablespoons pure maple syrup
- 2 tablespoons coconut oil, melted and slightly cooled
- ½ teaspoon cinnamon
- ¼ teaspoon sea salt
For the pumpkin filling
- 1 (15oz) can of pumpkin puree
- 1¼ cups raw cashews, soaked and drained *See soaking notes in the tips section below
- ½ cup pure maple syrup
- 2 tablespoons non-dairy milk
- 3 tablespoons coconut oil, melted and slightly cooled
- 2 tablespoons creamy almond butter *cashew butter can work, too
- 2 teaspoons pure vanilla extract
- 2 teaspoons pumpkin pie spice
- ½ teaspoon cinnamon
- ¼ teaspoon salt
Optional Vanilla Maple Whipped Cream
- 1 can chilled coconut milk, solid part only *chill can for 24 hours in the fridge
- ½ teaspoon pure vanilla extract
- ½ teaspoon pure maple syrup
- ⅛ teaspoon cinnamon
Instructions
- Make the crust. Add the oats and pecans to the base of a food processor and pulse until you have a coarse, crumbly mixture. Add the dates, maple syrup, coconut oil, cinnamon, and salt. Process until the mixture holds together like dough. *You may need to scrape the sides a few times during processing.
- Transfer the crust mixture to a pie dish and firmly press it into an even layer across the bottom and about halfway up the sides. Tip: Use a small sheet of wax paper to help press and smooth the crust without it sticking to your fingers. Place the crust in the freezer to firm up while you prepare the pumpkin filling.
- Blend the filling. Add the pumpkin puree, soaked cashews, maple syrup, non-dairy milk, coconut oil, almond butter, vanilla, pumpkin pie spice, cinnamon, and salt to a high-speed blender. Blend until silky and smooth. Scrape down the sides a few times as needed.
- Pour the creamy pumpkin filling over the prepared crust. Using a spatula, gently spread the mixture into a smooth, even layer, leveling the top for a beautiful finish.Refrigerate the pie for at least 8 hours, preferably overnight, to allow the filling to set. Tip: I highly recommend transferring the pie to the freezer for 30–60 minutes before serving. This helps firm up the creamy filling, making it easier to slice and serve.
- Optional Vanilla Maple Whipped Cream: Scoop the thick, solid cream from a chilled can of coconut milk into a small, deep mixing bowl. Using a hand mixer, whip until light and fluffy. Reduce the mixer speed to low and gently incorporate the maple syrup, vanilla extract, and cinnamon. If desired, immediately transfer the whipped cream to a piping bag fitted with a star tip and pipe a small decorative swirl along the outer edge of each pie slice. Finish by pressing a candied pecan into each whipped cream swirl for an extra-special touch! Check out my easy stovetop candied pecans recipe here.
Notes
Storage:
Refrigerator: Store leftover pumpkin pie covered or in an airtight container in the refrigerator for up to 5 days. Keep refrigerated until ready to enjoy for the best flavor and texture.
Freezer: This no-bake vegan pumpkin pie is freezer-friendly! Wrap the pie tightly in plastic wrap and place it in a freezer-safe container, or freeze individual slices for an easy treat later. Store for up to 2 months for the best quality. When ready to enjoy, thaw overnight in the refrigerator. I recommend adding the optional whipped cream and candied pecans just before serving.
To serve, slice the pie into 10 even pieces for standard dessert portions. For smaller servings, cut into 12 slices, or divide into 8 generous slices for larger portions.
Soak your cashews thoroughly. This is one of the most important steps for achieving that silky-smooth pumpkin filling! Soak them overnight in water or in boiling water for 30 minutes, then drain.
Use a high-speed blender. For the creamiest results, blend the pumpkin filling until completely smooth, stopping occasionally to scrape down the sides. You shouldn't see or feel any small pieces of cashews in the finished mixture.
Choose pure pumpkin puree. Use 100% pumpkin puree, not canned pumpkin pie filling. The latter contains added sweeteners and spices that can alter the flavor of this recipe.
Don't skip chilling the crust. Placing the prepared crust in the freezer while you make the filling helps it firm up and hold its shape when you add the creamy pumpkin mixture.
Give your pie plenty of time to set. I highly recommend preparing this recipe the day before you plan to serve it. Refrigerate for at least 8 hours, preferably overnight, to allow the filling to set properly.
For the prettiest slices, use the freezer trick! Since this no-bake pumpkin pie has a softer, mousse-like texture, I recommend transferring it to the freezer for 30–60 minutes before serving. This helps firm up the filling and makes slicing much easier.
Use a sharp, clean knife. For beautiful, bakery-style slices, run a sharp knife under warm water, carefully wipe it dry, and slice. Clean the blade between cuts for the neatest presentation.
Don't forget the whipped cream! Although completely optional, the homemade Vanilla Maple Whipped Cream adds a delicious finishing touch. For the best results, use thoroughly chilled, full-fat canned coconut milk and scoop out only the thick, solid cream.
Add your garnishes just before serving. Pipe a small swirl of whipped cream along the outer edge of each slice and finish with a candied pecan. It's such a simple way to make this homemade pumpkin pie look extra special for Thanksgiving!
*Nutrition facts do not include optional toppings.
Nutrition
Serving: 1slice | Calories: 409kcal | Carbohydrates: 47g | Protein: 7g | Fat: 24g | Saturated Fat: 8g | Polyunsaturated Fat: 4g | Monounsaturated Fat: 10g | Sodium: 125mg | Potassium: 490mg | Fiber: 6g | Sugar: 28g | Vitamin A: 6666IU | Vitamin C: 2mg | Calcium: 85mg | Iron: 3mg