No-Bake Vegan Peaches and Cream Layered Dessert Cups
With peach season in full force, enjoy this fresh summer treat all summer long! No-Bake Vegan Peaches and Cream is a simple dessert made in individual cups. This recipe is a healthy summer dessert that everyone will love.
Spotlight on This Vegan Peaches and Cream Dessert?
It’s healthy: You’ll only find wholesome ingredients in this recipe. Everything is dairy-free, unprocessed, and real. This vegan dessert is the way to go this summer! Ditch the peach pie and make this healthy version instead.
It’s easy to make: Layer the simple ingredients into small ramekins and place them in the fridge until you are ready to enjoy them. It is such an easy recipe.
It’s perfect for meal prepping: One of my favorite things about this no-nake recipe is that I can whip up the individual cups in the morning and have them ready for an evening gathering.
It’s the perfect cool summer treat: I don’t know about you, but I dig a nice cool dessert on a hot summer evening. Not to mention it’s packed with fresh peaches. Talk about the perfect summer dessert.
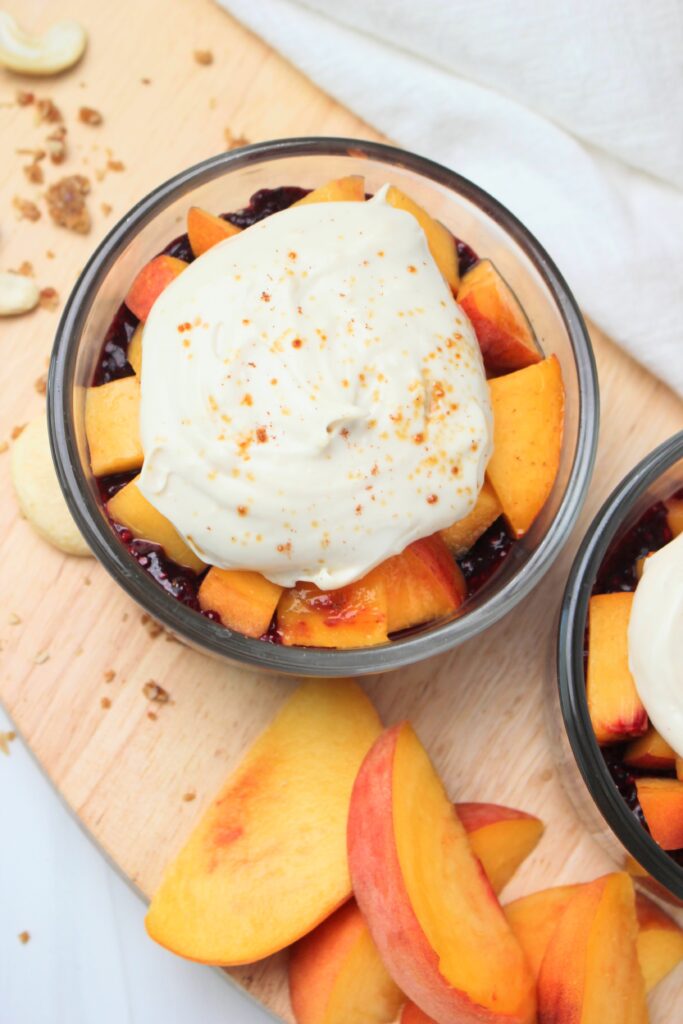
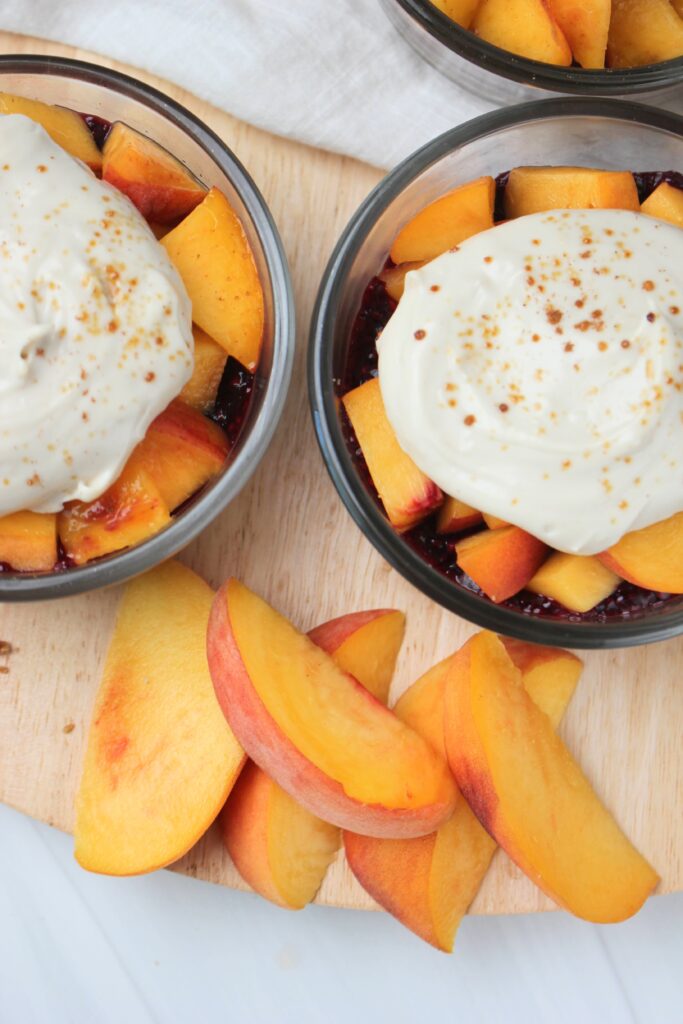
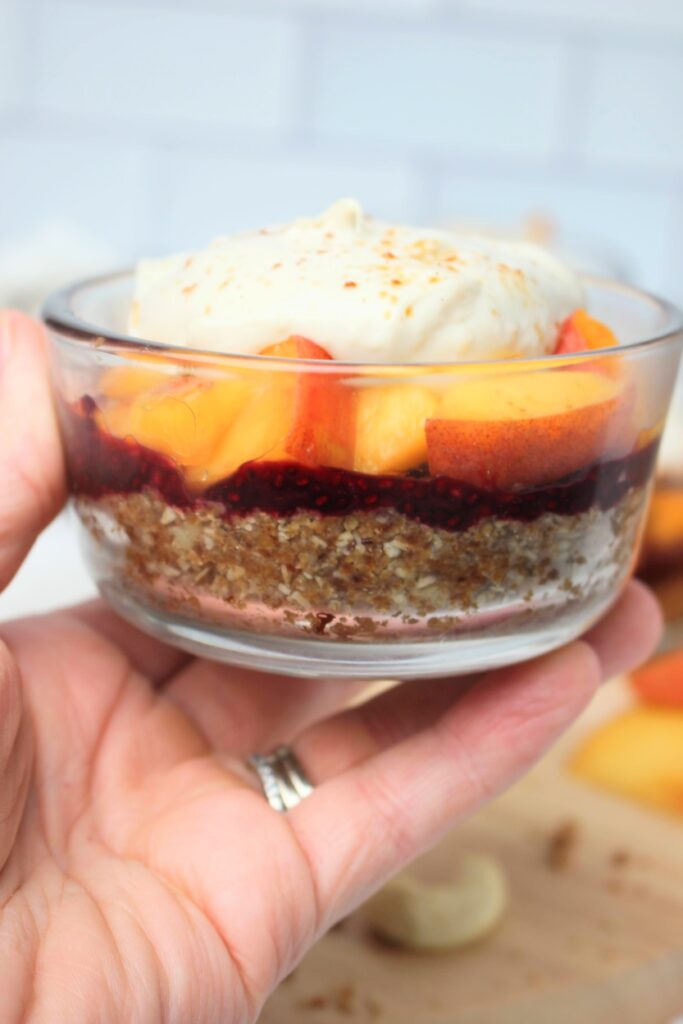
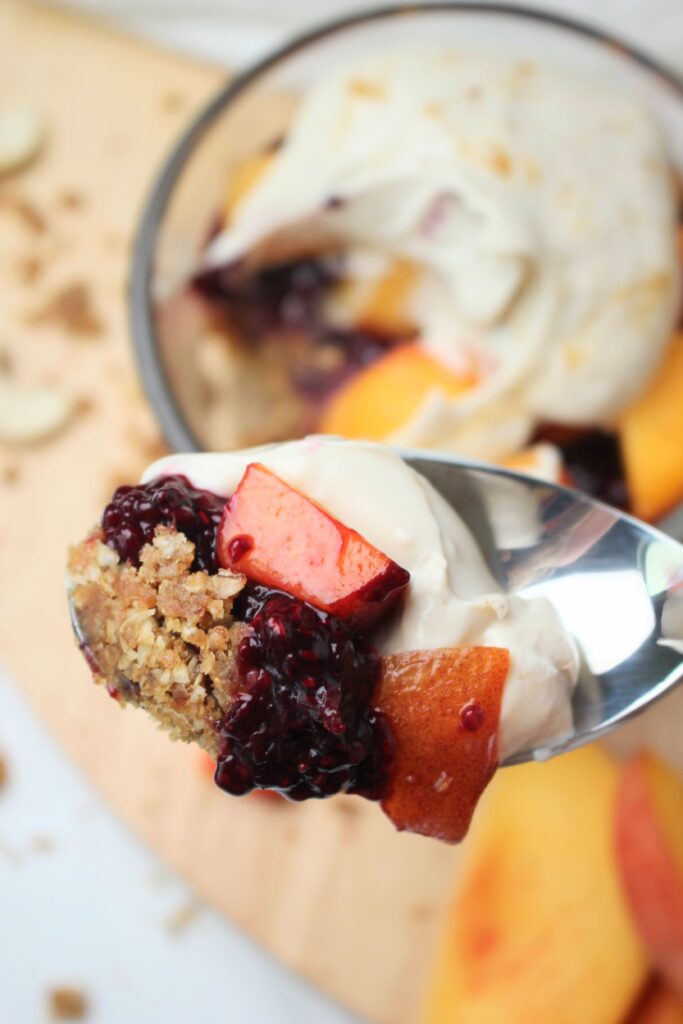
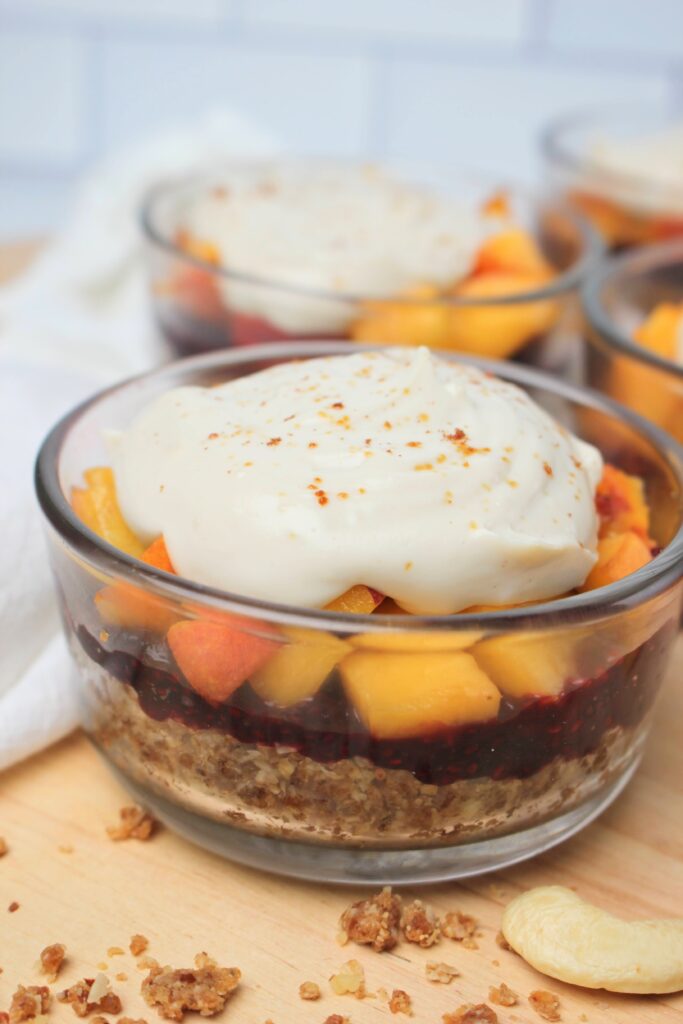
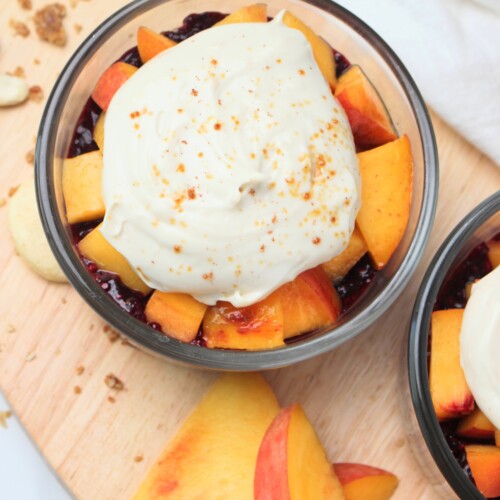
It’s delicious: Did I mention that this recipe has 4 decadent layers of wholesome goodness all packed into one small cup? You are going to love the peach pie vibe this dessert has going on.
How to Serve No-Bake Vegan Peaches and Cream Dessert
You have two simple choices.
You can enjoy this easy peach dessert straight out of the fridge as it is ready to eat.
You can also prepare the individual cups and either eliminate the cashew cream or keep it on the side. Next, heat the individual cups up until warmed through. Once heated, add a scoop of plant-based ice cream over the top or the prepared plant-based whipped cream from this recipe. In other words, the vegan whipped cream from this recipe should not be heated.
The Ingredients
For the bottom “crust” layer you will need the following ingredients.
Cashew butter: You can alternatively use almond butter for this recipe. I would not recommend any other varieties. This ingredient helps to bind everything together.
Walnuts: I have not tried other varieties of nuts. I do recommend sticking with walnuts as they provide heartiness and texture to the crust.
Oats: Make sure to use old-fashioned rolled oats for this recipe. If needed, go ahead and use a gluten-free variety instead.
Dates: Make sure to work with soft dates. You can achieve this simply by adding the pitted dates to a bowl of very hot water for about 5 minutes.
Other: Cinnamon, sea salt, and pure vanilla extract
For the middle, berry layer you will need the following ingredients.
Frozen berries: You can use raspberries, blueberries, strawberries, or a mixture of all three. I prefer a mixture for this recipe.
Chia seeds: These seeds will help to naturally thicken the berry layer. Not to mention they are very nutritious.
Maple syrup: While berries are naturally sweet, I love adding a hint of maple syrup to the berries to add additional natural sweetness.
For the fruit layer, you’ll need the following ingredient.
Fresh peach slices: Grab two large and ripe peaches for this recipe. I absolutely love how this dessert reminds me of old-fashioned peach pie without the calories.
For the final top layer, you will need the following ingredients.
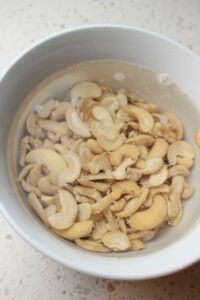
Soft cashews: If you add the cashews to hot water for 5-10 minutes, you will be all set.
Plant-based milk: You can use really any type of vegan milk from oat milk to hemp milk, to cashew milk to coconut milk. All varieties should work similarly.
Maple syrup: This is my favorite natural sweetener to use for healthier desserts. You could also use honey instead.
Vanilla extract and a pinch of salt to finish off this plant-based whipped cream.
The Instructions
Step one: For the first layer, add all of the base ingredients to the bowl of a food processor. This includes cashew butter, walnuts, oats, dates, cinnamon, vanilla extract, and salt.
Process until the mixture is crumbly but moist. You should be able to press a piece of dough between two fingers and it sticks together nicely. If it crumbles, continue processing. If needed, use a spatula and scrape down the sides of the bowl a few times.
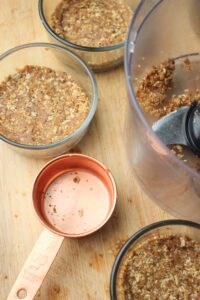
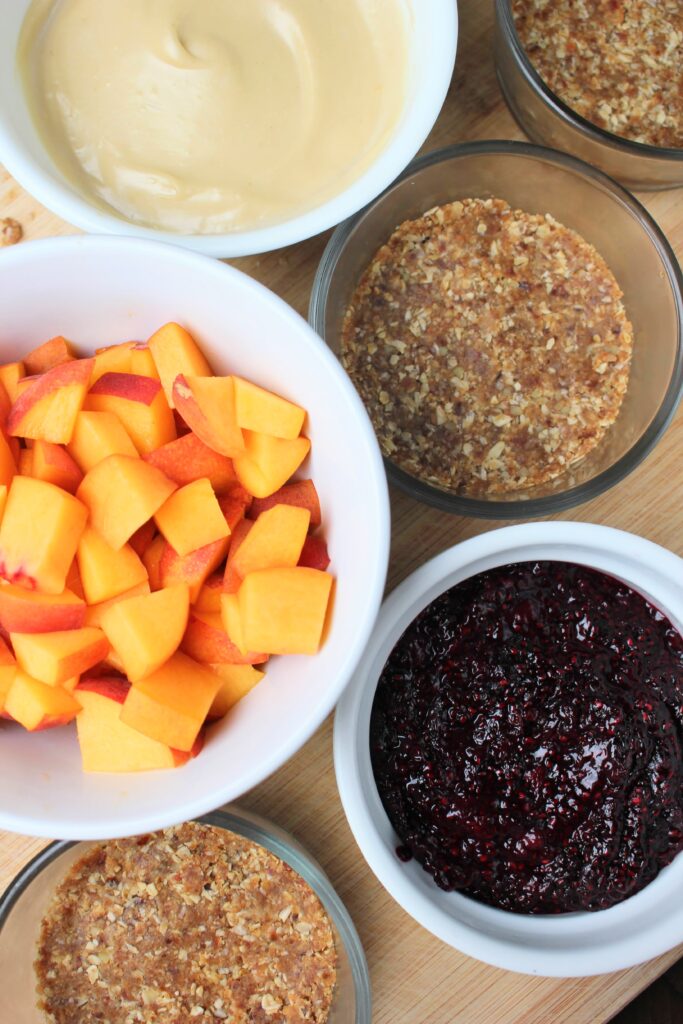
Step two: Add the crust mixture to the bottom of 4 ramekins or small jars. Use about 1/3 cup for each jar. Press the mixture with the bottom of a 1/3 measuring cup until it becomes one solid layer.
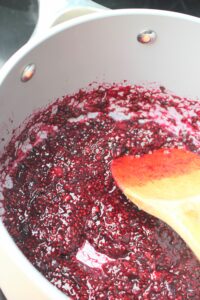
Step three: Make the second layer. Add the berries, chia seeds, and maple syrup to a saucepan. Turn the stove to medium heat and allow the berries to come to a low boil then reduce the heat and simmer uncovered for 10-15 minutes, stirring often. Continue until all of the berries have broken down and the mixture is slightly thickened. Remove the pan from the heat and transfer the berry mixture to a small bowl. Place the bowl into the freezer for about 15 minutes to allow it to cool quickly.
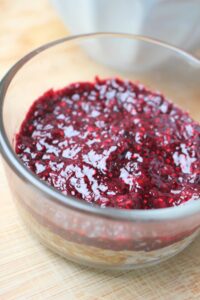
Step four: Add the second berry layer on top of the crust to all four ramekins. Make sure to even out the layer of berries.
Step five: Add a layer of chopped peaches as the third layer to all four ramekins.
Step six: Make the cashew cream. Add all of the ingredients to a high-speed blender and blend until creamy and smooth. Mine needed about 3 minutes. Just so you know, the cream can come pretty warm from blending that long. I like to allow it to sit for about 10 minutes until it becomes room temperature before placing it into each cup.
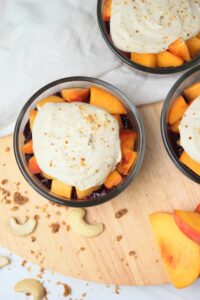
Step seven: Top each peach layer with a large dollop of cashew cream. I used all of my cream evenly for all four jars. Top with an optional sprinkle of cinnamon and coconut sugar.
Step eight: Serve immediately or place the ramekins in the fridge to chill for at least an hour before serving. Make sure to place plastic wrap over each cup.
Tips and Modifications
I do not recommend canned peaches. This recipe is meant for fresh peaches. But it is definitely your call.
This easy summer dessert does not require any cooking. It’s meant to be a cold treat, enjoyed straight out of the fridge.
If you want to eat this dessert warm, leave off the cashew cream and heat the first three layers in the microwave until warmed through. Next, add a scoop of vanilla ice cream or a dollop of cold cashew cream. Yum!
More Vegan Dessert Recipes
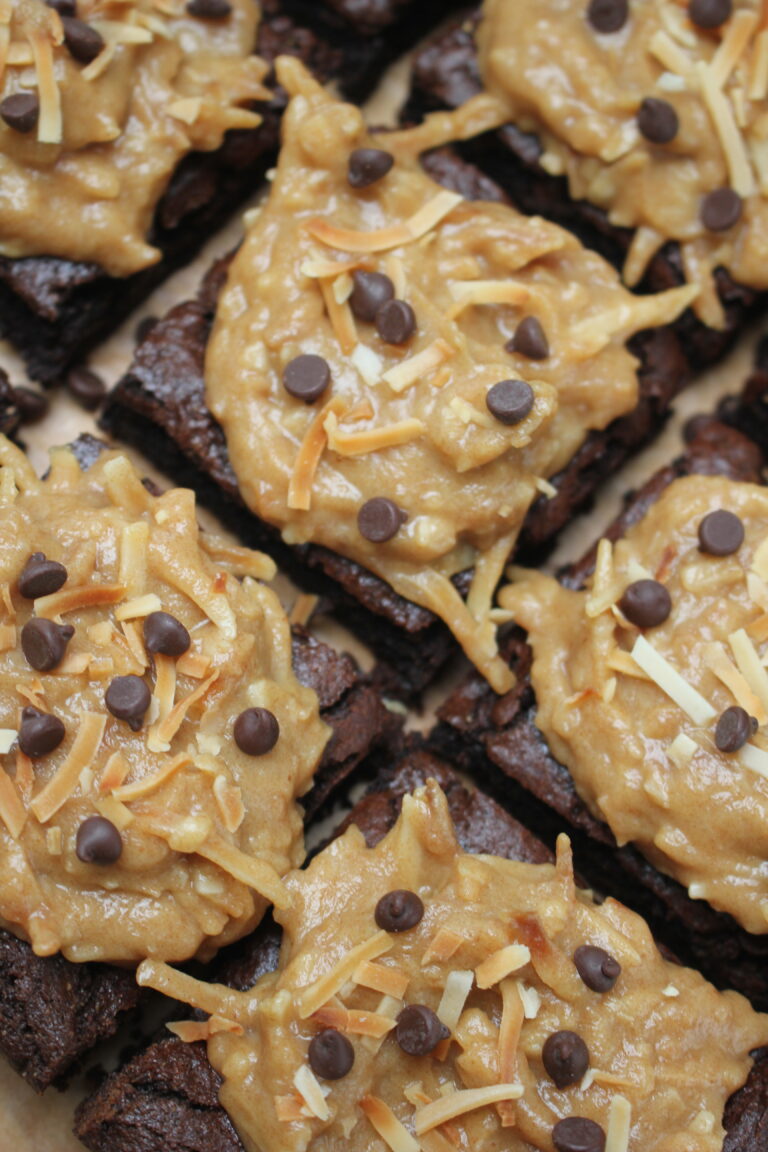
This dessert recipe takes brownies to an entirely new level with date-based caramel and toasted coconut frosting smeared over the top of each slice. Vegan Fudgy Brownies with Toasted Coconut Caramel Frosting are free from gluten, dairy, and refined flour or sugar. They are simply the best vegan brownies out there!
You’ll get all the vibes from this healthier classic New Orleans dessert, Healthier Banana Fosters Ice Cream (vegan). Made without any processed ingredients like brown sugar, this vegan version has all of the decadent flavors going on.
No-Bake Vegan Peaches and Cream Layered Dessert Cups
Equipment
- 1 medium pan for the berry layer
- 1 food processor for the crust layer
- 4 small glass bowls or ramekins
- 1 high speed blender for the cashew cream
Ingredients
For the 1st layer:
- 1 cup old-fashion oats
- 8 soft dates *soak in boiling water for 5 minutes if not soft
- ⅓ cup raw walnuts
- ¼ cup cashew butter (or almond butter)
- 1 teaspoon vanilla extract
- ½ teaspoon ground cinnamon
- ¼ teaspoon sea salt
For the 2nd layer:
- 1½ cups frozen mixed berries
- 2 tablespoons pure maple syrup
- 1 tablespoon chia seeds
For the 3rd layer:
- 2 large peaches, cut into small chunks
For the 4th layer:
- 1 cup soaked cashews *Soak overnight or in hot water for 25 minutes
- ½ cup plant-based milk
- 1 tablespoon pure maple syrup (honey can work, too)
- 1 teaspoon vanilla extract
- pinch of sea salt
Instructions
- For the first layer, add all of the base ingredients to the bowl of a food processor. This includes cashew butter, walnuts, oats, dates, cinnamon, vanilla extract, and salt. Process until the mixture is crumbly but moist. You should be able to press a piece of dough between two fingers and it sticks together nicely. If it crumbles, continue processing. If needed, use a spatula and scrape down the sides of the bowl a few times.
- Add the crust mixture to the bottom of 4 ramekins or small jars. Use about 1/3 cup for each jar. Press the mixture with the bottom of a 1/3 measuring cup until it becomes one solid layer.
- Make the second layer. Add the berries, chia seeds, and maple syrup to a saucepan. Turn the stove to medium heat and allow the berries to come to a low boil then reduce the heat and simmer uncovered for 10-15 minutes, stirring often. Continue until all of the berries have broken down and the mixture is slightly thickened. Remove the pan from the heat and transfer the berry mixture to a small bowl. Place the bowl into the freezer for about 15 minutes to allow it to cool quickly.
- Add the second berry layer on top of the crust to all four ramekins. Make sure to even out the layer of berries.
- Add a layer of chopped peaches as the third layer to all four ramekins.
- Make the cashew cream. Add all of the ingredients to a high-speed blender and blend until creamy and smooth. Mine needed about 3 minutes. Just so you know, the cream can come pretty warm from blending that long. I like to allow it to sit for about 10 minutes until it becomes room temperature before placing it into each cup.
- Top each peach layer with a large dollop of cashew cream. (I used all of my cream evenly for all four jars. Top with an optional sprinkle of cinnamon and coconut sugar.
- Serve immediately or place the ramekins in the fridge to chill for at least an hour before serving. Make sure to place plastic wrap over each cup.