Melt-In-Your-Mouth Vegan Monster Cookies
These chocolatey, dairy-free cookies are not only fun to eat, but they are made from wholesome ingredients. You won’t find any artificial or processed ingredients in these Melt-in-your-Mouth Vegan Monster Cookies, besides the optional candy eyes. They are easy to make and made with simple ingredients.
There’s nothing more adorable than eating eyeballs on a cookie, right? Haha, but seriously. I love adding a festive twist to my baked goods.
You know I am a mom when I add color-coated chocolate candies to my cookies, right? Does anyone else feel me? And, if I have to be honest, I actually enjoy them just as much as my kids! LOL!
Spotlight on These Vegan Monster Cookies
- They are melt-in-your-mouth soft: These cookies bake up with a perfectly tender texture that literally melts in your mouth.
- They are made with wholesome ingredients: With plant-based staples and no artificial additives, these cookies strike the perfect balance between indulgence and nourishment.
- They are fun to bake and eat: Topped with candy eyes, these vegan monster cookies are playful treats that will bring all smiles.
- They are easy to make: With simple pantry ingredients and no complicated steps, these one-bowl cookies are perfect for busy vegan bakers wanting something quick and delicious.
- They are crowd-pleasers: Whether you’re baking for kids, potlucks, or a cozy night in, these soft, chocolatey cookies are universally loved and always disappear fast.

The Ingredients
The ingredients are simple. These monster cookies will be in your belly in no time! Head to your pantry and grab these few ingredients.
Vegan butter: This butter alternative is the perfect replacement for simple butter, without dairy. It gives the same texture and buttery flavor as its counterpart.
Coconut sugar: This is a great sugar replacement as it is natural and unprocessed. Unlike white sugar which is stripped of all nutrients.
Vanilla: Make sure to use pure vanilla extract instead of imitation vanilla. And, don’t skip this step. This ingredient is crucial to baking!
Almond flour: Your stomach will love this flour option which is gluten-free and unprocessed.
Oat flour: Once again, this ingredient is a healthy alternative to white flour. The combination of oat flour and almond flour really transforms these chocolaty cookies.
Cacao: This is the main ingredient that turns these cookies from vanilla to chocolate. I like to make sure to use a high-quality brand.
Baking soda and powder: These powders are responsible for helping the cookies rise perfectly. You can find these ingredients in most baked goods.
Plant-based milk: I like to use my homemade oat, coconut, and almond milk. However, go ahead and use whatever dairy-free brand you have on hand.
Maple syrup: Isn’t the flavor of maple just divine? And, the good news is that this natural sweetener is not processed, has no artificial ingredients, and the nutritional properties still remain.
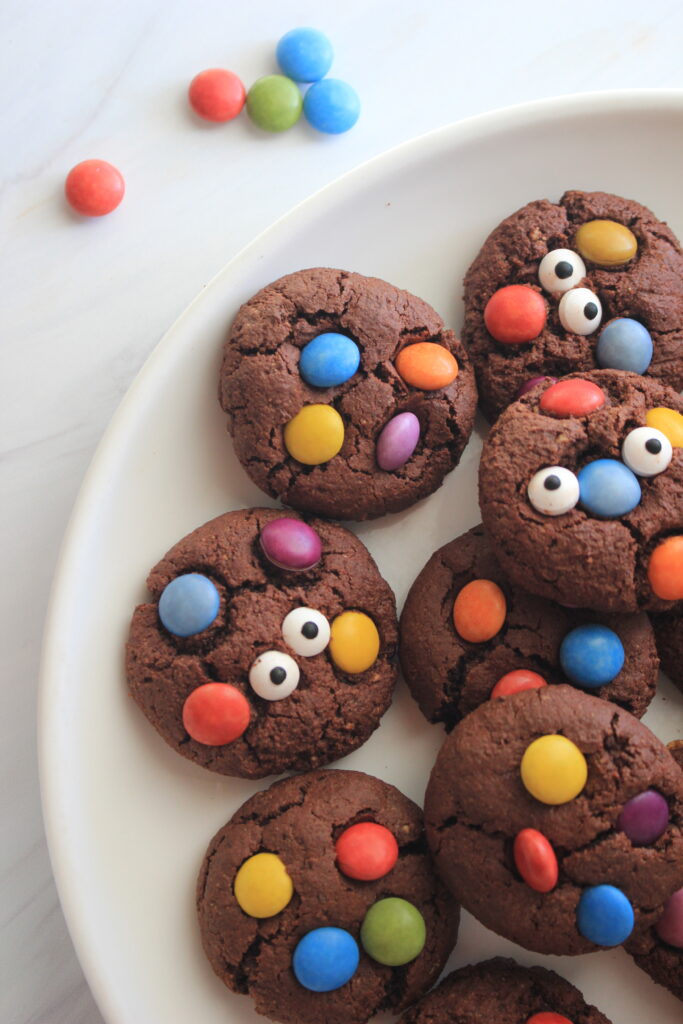
Color-coated chocolate candies: Notice I am not using M&M’s. The candies I use are free from dyes and other artificial ingredients, as well as dairy-free.
Eye candies: This is the only ingredient that I was unable to find in a more natural form. Oh well, it is pretty small. You could skip this step if you did not have these candies available.

The Instructions
Step one: Preheat the oven to 350 degrees Fahrenheit. Line a cookie sheet with either parchment paper or a silicone mat.
Step two: In a medium-sized bowl and using a mixer, cream the softened butter, coconut sugar, plant milk, vanilla, and maple syrup for about one minute.
Step three: While the mixer is running, slowly add in the dry ingredients, one at a time. Start with oat flour, almond flour, cacao powder, baking soda, baking powder, and then salt. Mix until dough forms, but do not over-mix. If needed, stop and scrape down the sides ever so often to make sure all of the ingredients get mixed in.
Step four: Take spoonfuls of dough and roll them into about 1-inch balls. Place the balls spaced out on a lined cookie sheet. Press 3-4 color-coated chocolate candies into each cookie. Bake in the oven for 11-13 minutes. The centers will still be soft, however the edges should be light golden brown.
Step five: Immediately press 2 candy eyeballs into the tops of each cookie.
Then, allow the cookies to cool for about 10 minutes on the cookie sheet and then transfer them to a cooling rack to cool completely. Once they are totally cool, transfer them to an air-tight container.

Tips and Modifications
Feel free to use chocolate chips instead of color-coated candies and remove the eyes completely.
You can place your dough in the fridge for 30 minutes before baking if you have the time.
Storage
Place the cookies in an air-tight container. They can sit on the counter in a cool spot for up to 6 days, in the fridge for up to 2 weeks, or in the freezer for up to 2 months.
My favorite way to eat them is from the fridge. What is your favorite? Comment below and let me know!
More Vegan Cookie Recipes
Chewy Vegan Almond Butter Cookies
Banana Oatmeal Chocolate Chip Cookies
Ginger Spiced White Chocolate Chip Cookies
Melt-In-Your-Mouth Vegan Monster Cookies
![Melt-in-your-mouth vegan monster cookies]](https://happyandwholesomemommy.com/wp-content/uploads/2022/10/Melt-in-your-mouth-vegan-monster-cookies-21-scaled-e1667184728829-500x500.jpg)
Equipment
- 2 medium mixing bowls
- 1 electric mixer
- 1 lined cookie sheet
Ingredients
- ½ cup soft vegan butter
- ½ cup coconut sugar
- 2 tablespoons pure maple syrup
- 2 tablespoons plant-based milk
- 1 teaspoon pure vanilla extract
- 1 cup oat flour
- ½ cup almond flour
- ⅓ cup cacao powder
- 1 teaspoon baking soda
- ½ teaspoon baking powder
- ¼ teaspoon salt
- ½ cup candy-coated chocolates If vegan, use dairy-free chocolate chips instead
- 36 candy eyes
Instructions
- Preheat the oven to 350 degrees Fahrenheit. Line a cookie sheet with either parchment paper or a silicone mat.
- In a medium-sized bowl and using a mixer, cream the softened butter, coconut sugar, plant milk, vanilla, and maple syrup for about one minute.
- While the mixer is running, slowly add in the dry ingredients, one at a time. Start with oat flour, almond flour, cacao powder, baking soda, baking powder, and then salt. Mix until dough forms, but do not over-mix. If needed, stop and scrape down the sides ever so often to make sure all of the ingredients get mixed in.
- Take spoonfuls of dough and roll them into about 1-inch balls. Place the balls spaced out on a lined cookie sheet. Press 3-4 color-coated chocolate candies into each cookie. Bake in the oven for 11-13 minutes. The centers will still be soft however, the edges should be light golden brown.
- As soon as the cookies come out of the oven, carefully press 2 candy eyeballs into each cookie. Allow the cookies to cool for about 10 minutes on the cookie sheet and then transfer them to a cooling rack to cool completely. Once they are totally cool, transfer them to an air-tight container.


Trying to make: You forgot the amount of baking powder. And isn’t there supposed to be more ingredients like coconut, etc in monster cookies?
Hey! I am so sorry for the confusion. I definitely will update this recipe to reflect the baking powder! It was 1/2 teaspoon of baking powder. These are called “monster cookies” because they have candy eyeballs! The concept of these cookies is simple vegan chocolate cookies that are appealing for the kiddos! My girls love them. Thanks for your patience, friend! I hope you enjoy them!